Group Tab
This ![]() tab contains routing options for the Route Entry to Group activity. It enables you to assign the entry to a Laserfiche group. All settings in this tab must be configured.
tab contains routing options for the Route Entry to Group activity. It enables you to assign the entry to a Laserfiche group. All settings in this tab must be configured.
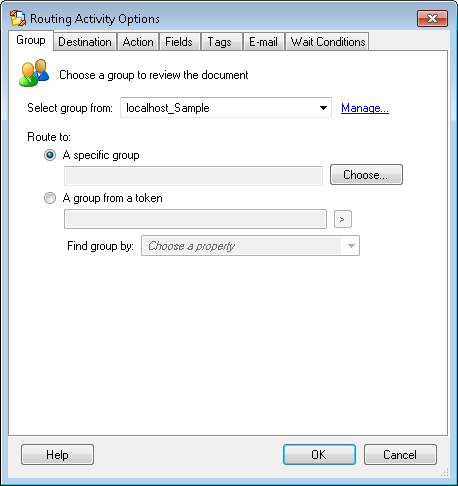
To open the Group tab
- Add the Route Entry to Group activity to your workflow definition by dragging it from the Toolbox Pane and dropping it in the Designer Pane.
- Select the activity in the Designer Pane.
- Under Routing Options in the Properties Pane, click the
 required group icon to open the Group tab of the Routing Activity Options dialog box.
 - Next to Select group from, select the Laserfiche or LDAP trustee directory containing the desired group. Click Manage to open the Trustee Directory Manager to add or remove an LDAP or Laserfiche Server that is providing user information to Workflow.
- Choose one of the following configuration methods below.
Note: Workflow will only interact with a Laserfiche or LDAP trustee directory if it appears in the Workflow Administration Console's Trustee Directories node.
To always assign the entry to the same group
- Under Route to, select A specific group and click Choose to open the Trustee Search dialog box.
- Next to Search Value, enter a search term (e.g., a group's name). Click Search. If a match is found, the group will appear under Properties.
- Once the desired group has been found, fill in any other properties that were not filled in automatically, and click OK.


Optional: Click Additional properties to view additional group properties.
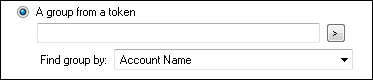
To assign the entry to a group based on a token value
Example: A workflow is designed to route documents to one of two possible groups: Accounting or Legal. While processing, the workflow checks the value of a specified token. If the token value matches a property value assigned to Accounting, the document will be routed to Accounting's working folder. If the token value matches a property assigned to Legal, it will be routed to Legal.
- Select A group from a token value.
- Click the token button (right arrow)
 to select a token. For more token options, select Token Dialog from the drop-down box.
 - In the drop-down menu next to Find user by, select which user/group property the token refers to.
Tip: Laserfiche automatically produces tokens for field values. You can use the Token dialog box to assign these tokens to this activity. ![]() Show me an example.
Show me an example.
Note: If you choose the wrong property in the Find user by menu, the activity will try to retrieve the user/group by looking through each property in turn, and it may take longer for the activity to complete.